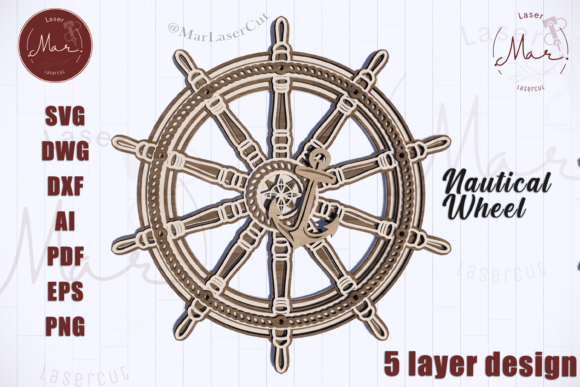
Mastering Multilayer Design: A Complete Guide to the Nautical Ship Wheel 3D SVG
In the evolving world of digital fabrication, few projects capture the imagination quite like multilayer vector designs. Among these, the Nautical Ship Wheel 3D Multilayer SVG stands out as a perfect blend of maritime tradition and modern manufacturing technology. Whether you are a hobbyist just starting with a desktop cutter or an experienced artisan running a commercial laser workshop, understanding how to leverage these layered files is essential for creating stunning, professional-grade decor.
This guide explores the intricacies of working with 3D layered vectors, specifically focusing on nautical themes. We will demystify the file formats, discuss material selection, and provide practical advice on assembly to help you transform a digital download into a tangible masterpiece.
What is a Multilayer 3D SVG?
At its core, a standard SVG (Scalable Vector Graphic) is a two-dimensional image defined by mathematical paths rather than pixels. However, a multilayer SVG takes this concept further by separating a single design into multiple distinct files or groups, each representing a different depth level of the final object.
For the Nautical Ship Wheel design, the complexity of the wheel's spokes, rim, and central hub is broken down into five separate layers. When these layers are cut from material and stacked sequentially, they create a physical illusion of depth and shadow, resulting in a true 3D effect without the need for complex 3D modeling software or printing.
This approach is significant because it bridges the gap between flat graphic design and sculpture. It allows creators to produce items that feel substantial and handcrafted, adding texture and visual interest that flat decals simply cannot achieve.
The Significance of Precision and Scale
One of the most critical aspects of working with layered designs is understanding scale and tolerance. The Nautical Ship Wheel template typically comes with overall dimensions of approximately 39 x 39 cm (15.3 x 15.3 inches). While this is a robust size for wall art, one of the greatest advantages of vector files is their scalability.
You can resize the design within your cutting machine's software to fit any space, from a small gift tag to a large foyer installation. However, a common misunderstanding among beginners is that vectors can be shrunk infinitely without consequence. This is not entirely true.
When downsizing a multilayer design, you must keep "thin items" in mind. If you shrink the ship wheel too much, the delicate gaps between the spokes or the fine details of the inner hub may become narrower than your laser beam's kerf (the width of material removed by the cut) or the mechanical tolerance of a paper cutter. This can lead to pieces falling apart or failing to cut through entirely. Always preview your scaled design to ensure structural integrity before sending it to the machine.
Compatible File Formats and Software
Versatility is key in digital crafting. The ideal product package for a project like this includes a comprehensive ZIP folder containing multiple file types to ensure compatibility with virtually any workflow:
- SVG & DXF: The industry standards for silhouette cutters (like Cricut or Silhouette) and many laser software suites.
- AI & EPS: Essential for professional graphic designers using Adobe Illustrator or CorelDRAW who need to edit anchor points or adjust layer spacing.
- DWG: Often preferred by engineers and those using CAD-based laser systems.
- PDF & PNG: Useful for quick previews, printing stencils, or visual references during the assembly phase.
Having access to this variety ensures that whether you are using high-end industrial machinery or a home hobbyist setup, you have the right tool for the job.
Material Selection: From Wood to Acrylic
The beauty of the Nautical Ship Wheel design lies in its adaptability to various materials. The choice of material fundamentally changes the aesthetic and the finishing process.
Wood and MDF for Painting
If your goal is a classic, rustic, or custom-painted look, MDF (Medium Density Fiberboard) or Plywood is highly recommended. These materials are cost-effective, cut cleanly with lasers, and provide a smooth surface for painting. Because wood has natural grain, it adds warmth to the nautical theme. When using wood, the layering effect creates deep shadows that enhance the 3D perception, especially if you choose to paint the recessed layers a darker shade than the top layer.
Acrylic and Plexiglas for Modern Finishes
For a sleek, contemporary, or maritime-glass look, colored acrylic or plexiglass is the superior choice. You can utilize clear acrylic for the base layers and colored or glitter-infused acrylic for the top layers. This combination allows light to pass through the lower levels while the top layer catches the eye. Glitter acrylic, in particular, mimics the sparkle of sunlight on ocean water, making it a thematic perfect match for a ship wheel.
Paper and Cardboard
Do not underestimate the power of paper. For scrapbooking, card making, or intricate paper quilling projects, heavy cardstock works beautifully. The precision of digital cutting allows for layers of paper to be stacked with adhesive foam tabs, creating a lightweight yet dimensional piece of art.
Step-by-Step Assembly Instructions
Creating the final product is a methodical process that rewards patience. Follow these general steps to assemble your Nautical Ship Wheel:
- Preparation: Organize your cut layers immediately after machining. Label them if necessary, referring to the provided reference image in your download package. The order usually proceeds from the largest background layer to the smallest foreground detail.
- Cleaning: Remove any soot (from laser cutting) or dust. If cutting wood, a light sanding of the edges may be required for a premium finish.
- Painting (Optional): If using wood or MDF, paint your layers now. It is often easier to paint the pieces individually before assembly to ensure full coverage in the crevices. Let them dry completely.
- Stacking: Begin adhering the layers. Use a strong craft glue, epoxy, or double-sided adhesive tape. Apply adhesive sparingly to avoid squeeze-out, which can ruin the finish. Align the registration marks or center points carefully.
- Finishing: Once assembled, you can add a clear coat sealant to protect the paint or enhance the shine of the acrylic.
The possibilities for customization are endless. You might choose a distressed white finish for a "shabby chic" coastal vibe or a high-gloss navy blue for a modern nautical interior.
Common Pitfalls to Avoid
A frequent error in multilayer projects is misalignment. Even a millimeter of shift between layers can make the design look amateurish. Take your time during the gluing process. Additionally, when combining materials (e.g., wood layers with an acrylic top), ensure the thickness of each layer is consistent unless a varied depth is intentionally part of the design.
The Role of Community and Creativity
Digital design is not a solitary endeavor; it thrives on community sharing and inspiration. Creators are encouraged to document their journey and share their finished products. Tagging designers or sharing updates on platforms like Instagram helps build a portfolio of what is possible with these files.
Seeing how others interpret the same Nautical Ship Wheel file—perhaps one person uses reclaimed barn wood while another uses neon pink acrylic—broadens our collective understanding of the medium. It inspires new techniques and pushes the boundaries of what we consider "standard" crafting.
Whether you are decorating a beach house, creating gifts for sailing enthusiasts, or expanding your product line for a small business, mastering multilayer SVGs opens a world of creative potential. By respecting the technical constraints of scaling, choosing the right materials, and embracing the assembly process, you can turn a simple digital download into a cherished piece of physical art.
Remember, the file is just the blueprint; your creativity is the engine that brings the ship wheel to life. So, gather your materials, fire up your cutter, and let your imagination set sail.