Mastering the Heart Shape Chocolate Box 3D Shadow Box for Stunning Valentine's Creations
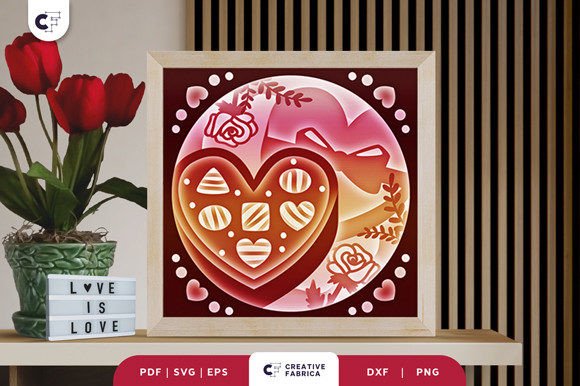
Hello, crafters. If you are looking to elevate your paper crafting game this season, the Heart Shape Chocolate Box 3D Shadow Box offers a sophisticated blend of romance and engineering. This layered, square paper cutting template is designed to create depth and visual interest, transforming flat cardstock into a tangible expression of affection. Whether you intend to gift it to a friend, family member, or someone special, or perhaps sell finished pieces as a small business owner, understanding the nuances of this project is essential for professional results.
The template typically arrives in versatile formats including SVG, PDF, EPS, PNG, and DXF, ensuring compatibility with major cutting machines like Silhouette and Cricut, as well as traditional hand-cutting methods. With ten distinct layers and a standard size of 20.32×20.32 cm, the design relies on precise assembly to achieve its signature shadow effect. However, even experienced creators can stumble over simple details that compromise the final quality. By addressing common pitfalls before you begin, you can ensure your project looks polished rather than problematic.
Selecting the Right Materials for Structural Integrity
One of the most frequent errors crafters make involves underestimating the importance of paper weight. When working with a multi-layered design like the Heart Shape Chocolate Box 3D Shadow Box, using standard printer paper or lightweight scrapbook paper often leads to sagging layers and a loss of definition. The delicate bridges and intricate cutouts require rigidity to hold their shape against gravity and the tension of adhesive.
To avoid a flimsy final product, it is highly recommended to use heavy cover stock. Specifically, Encore Cardstock 80 lb cover (216 gsm) provides the ideal balance of flexibility for cutting and stiffness for structure. This weight ensures that each of the ten layers remains distinct, preserving the 3D illusion. If you deviate from this recommendation, you may find that the layers collapse inward, ruining the depth effect you worked hard to create. For those sourcing materials, visiting a dedicated 12×12 Cardstock Shop can provide access to high-quality options that match these specifications.
Navigating File Formats and Machine Settings
While the inclusion of an SVG file makes this project accessible for digital cutters, blindly trusting default machine settings is a recipe for frustration. A common misunderstanding is assuming that an SVG file ready for one machine will perform identically on another without adjustment. Different blades, mats, and motor strengths require tailored pressure and speed settings.
Before committing your expensive cardstock to a full cut, always perform a test cut on a small scrap piece of the same material. This simple step saves time and money by preventing torn edges or incomplete cuts, which are particularly damaging in intricate shadow box designs where fine details connect the layers. Additionally, remember that while SVG files can be resized, you must keep the same aspect ratio. Distorting the image by stretching it horizontally or vertically will misalign the registration marks between layers, making assembly impossible.
For those without electronic cutting machines, do not feel excluded. The PDF and PNG formats included in the package are perfectly suitable for manual cutting with an art knife and scissors. The key here is patience and a sharp blade. Dull tools crush the paper fibers rather than slicing through them, leading to frayed edges that detract from the clean lines required for a professional look.
Assembly Techniques for Flawless Depth
The assembly phase is where the magic happens, but it is also where many projects go wrong. A prevalent mistake is applying too much adhesive or using the wrong type. Liquid glue can warp thin paper and create visible bumps, while standard tape may not hold the weight of multiple layers over time. Instead, opt for double-sided tape or foam adhesive squares specifically designed for paper crafting. These provide a secure bond without adding bulk or moisture.
When stacking the ten layers, consistency in spacing is crucial. Uneven gaps between layers disrupt the visual flow and can make the shadow box look cluttered rather than dimensional. Take your time to align each layer perfectly before pressing it down. Using a lightbox or a bright window during assembly can help you see through the layers to ensure perfect registration.
Furthermore, consider the end goal of your project early in the process. Are you creating a framed wall decoration or a light box? If you plan to add LED strips between the layers for a special glowing effect, you must account for the additional thickness of the wiring and lights during assembly. Failing to plan for this can result in a frame that is too shallow to close properly or layers that are crushed by the electronics.
Managing Expectations Regarding Color and Lighting
It is important to manage expectations regarding the final appearance of your project. Preview images online are often enhanced or shot under studio lighting conditions that may not reflect reality. The actual final product color may slightly vary due to lighting sources and the specific paper color you choose. This is not a defect in the template but a natural characteristic of physical media.
To mitigate disappointment, order sample packs of cardstock if you are particular about color matching. View the paper under the same lighting conditions where the finished shadow box will be displayed. Natural daylight reveals true colors, while warm indoor lighting can shift hues significantly. Understanding this variable helps you select paper tones that complement your environment rather than clash with it.
Making the Right Choice for Your Skill Level
Finally, evaluate your own skill level and available time before starting. While the Heart Shape Chocolate Box 3D Shadow Box is designed to be user-friendly, it involves ten separate layers that require precision. Beginners should allocate more time for weeding (removing excess paper) and assembly than the product description might suggest. Rushing the process often leads to torn tabs or misaligned hearts.
For educators and workshop leaders, this project serves as an excellent teaching tool for patience and spatial reasoning, but it requires careful supervision when students are using cutting tools. For entrepreneurs, producing these in bulk requires an efficient workflow; consider batching your cuts and setting up an assembly line for gluing to maintain consistency across multiple units.
By paying attention to material quality, machine settings, adhesive choices, and lighting conditions, you can transform a simple digital file into a breathtaking physical object. Whether you are a hobbyist looking for a weekend project or a marketer seeking unique content, approaching the Heart Shape Chocolate Box 3D Shadow Box with preparation and care ensures a satisfying and beautiful result.