Creating a Stunning Floral Happy Mother's Day 3D Shadow Box: A Crafter's Guide to Perfect Results
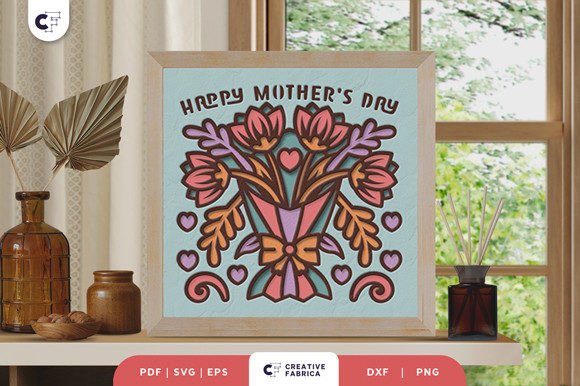
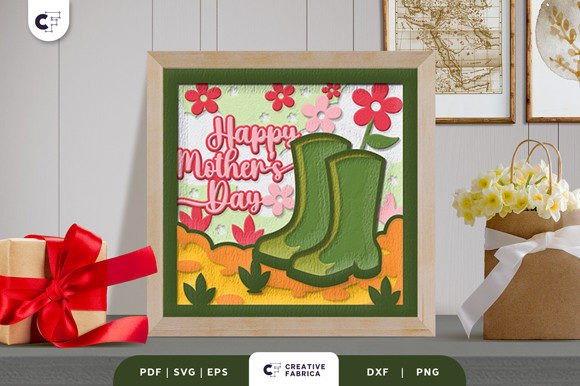
Hello, crafters. If you are looking to create a heartfelt gift that stands out from the typical greeting cards and bouquets, a layered paper cutting project is an excellent choice. Specifically, the Floral Happy Mother's Day 3D Shadow Box offers a sophisticated way to express affection through depth, texture, and intricate design. This project involves assembling nine distinct layers of cut paper to create a dimensional scene that captures the eye and warms the heart. However, while the concept is straightforward, the execution requires attention to detail. Many enthusiasts rush into cutting and gluing without considering the nuances of material selection, layer spacing, and file preparation, often leading to a final product that looks flat or feels fragile. Let's walk through how to approach this project correctly to ensure your effort yields a professional-looking keepsake.
Understanding the Project Scope and File Formats
Before you fire up your machine or pick up your art knife, it is crucial to understand exactly what you are working with. This specific template is a square design measuring 20.32×20.32 cm (approximately 8x8 inches). It comes in a variety of formats including SVG, PDF, EPS, PNG, and DXF. The inclusion of an SVG file is particularly valuable because it allows for seamless use with popular cutting machines like Silhouette or Cricut. If you do not own a digital cutter, the PDF and PNG files are perfectly suitable for manual cutting with scissors or a precision art knife.
A common misunderstanding among beginners is assuming all file formats behave the same way when resized. While SVG files are vector-based and can be scaled infinitely without losing quality, raster images like PNGs can become pixelated if enlarged too much. Furthermore, when resizing the SVG to fit a specific frame you may have on hand, you must maintain the aspect ratio. Stretching the design horizontally or vertically will distort the floral elements and misalign the layers, ruining the 3D effect. Always lock the aspect ratio in your design software before making any size adjustments.
Selecting the Right Materials for Durability and Depth
The difference between a hobbyist project and a professional-grade shadow box often comes down to paper weight. A frequent mistake is using standard printer paper or lightweight cardstock. These materials lack the structural integrity needed to hold their shape between layers, leading to sagging and a loss of the intended 3D dimension. For this project, the recommendation is to use Encore Cardstock 80 lb cover (216 gsm). This weight is substantial enough to stand up to the adhesive and maintain the gap between layers without bowing, yet thin enough to be cut cleanly by most machines.
Another overlooked detail is color consistency. When ordering paper online, remember that screen images are for preview purposes only. The actual final product color may slightly vary due to lighting sources and the specific dye lot of the paper manufacturer. To avoid a mismatched palette, try to purchase all your cardstock from the same batch or supplier. If you are sourcing materials, visiting a dedicated 12×12 Cardstock Shop can ensure you get high-quality, consistent sheets that match the designer's intent. Using varied brands for different layers can result in subtle shifts in hue or texture that distract from the cohesive floral theme.
Assembly Techniques: Avoiding the "Flat" Look
The magic of a Floral Happy Mother's Day 3D Shadow Box lies in the spacing between the nine layers. A prevalent error during assembly is applying glue directly to the entire back surface of each layer. This compresses the paper, eliminating the shadows that create the 3D illusion. Instead, you should use small dots of liquid glue, double-sided tape squares, or foam adhesive tabs placed strategically at the corners and key structural points.
If you plan to display this as a framed wall decoration, ensure your frame has enough depth to accommodate all nine layers plus the backing. Standard photo frames are often too shallow. Measure the total thickness of your stacked paper and add a millimeter or two for clearance. If the frame is too tight, the glass will press against the front layer, flattening the design. Conversely, if there is too much empty space behind the last layer, the depth effect diminishes. Precision here ensures the light plays across the cutouts exactly as intended.
Enhancing the Design with Lighting
For those wanting to elevate the project further, converting this shadow box into a light box is a fantastic option. By adding LED strips between the layers, you can create a glowing, ethereal effect that highlights the intricate floral details. However, this introduces new considerations. You must ensure the LEDs do not generate excessive heat, which could warp the cardstock over time. Battery-operated LED strips are generally safer and easier to conceal within the frame than plug-in varieties.
When integrating lights, test the brightness before final assembly. Too much light can wash out the delicate cuts, making the layers indistinguishable from one another. The goal is to cast soft shadows that accentuate the depth, not to illuminate the paper so brightly that the contrast is lost. Start with dimmable strips or place a diffuser sheet behind the front layer if the light source is too harsh.
Final Checks Before Gifting
Before presenting this beautiful creation to a friend, family member, or someone special, perform a final quality check. Ensure all layers are aligned perfectly; even a millimeter of offset can look like a mistake rather than an artistic choice. Check that no glue residue is visible on the front of the design, as this can attract dust and detract from the clean lines of the floral pattern.
Remember, this template is versatile. Whether you choose classic pastels for a soft, traditional look or bold, contrasting colors for a modern twist, the underlying structure remains the same. The key to success is patience during the weeding and assembly process. Rushing the gluing stage is the fastest way to compromise the structural integrity of the box. Take your time, let the adhesive set properly between layers, and respect the dimensions provided in the template files.
By paying attention to these details—material weight, aspect ratios, adhesive placement, and lighting—you transform a simple digital download into a cherished heirloom. The Floral Happy Mother's Day 3D Shadow Box is more than just a craft; it is a demonstration of care and creativity. With the right approach, your final piece will not only survive the crafting process but thrive as a stunning centerpiece that honors the recipient in a truly unique way.