Building a Festive Centerpiece with Gingerbread House 3D Papercraft
Holiday decorating often feels like a tug-of-war between wanting something magical and needing something practical. You want the warmth of a traditional gingerbread house without the mess of melted sugar, the risk of attracting ants, or the heartbreak of it collapsing before New Year's Eve. This is where Gingerbread House 3D Papercraft steps in as a brilliant solution. It isn't just a paper model; it is a durable, reusable, and highly customizable centerpiece that brings the aesthetic of a classic holiday treat into your home or business without the edible complications. Whether you are a hobbyist looking for a winter project, a teacher planning a classroom activity, or a small business owner needing eye-catching window displays, this design offers a versatile foundation for creativity.
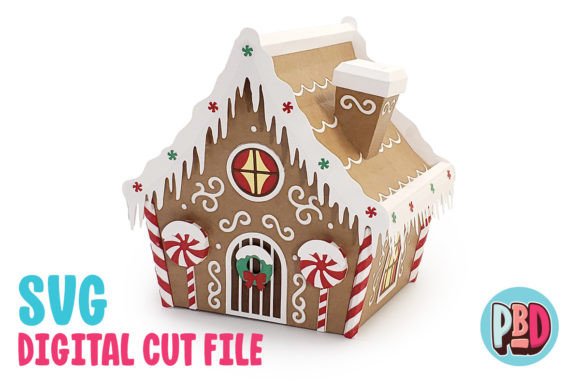
The appeal of this specific design lies in its balance of detail and buildability. Measuring 9 inches wide, 8.5 inches deep, and 9 inches high, it hits the sweet spot for tabletop decor. It is substantial enough to command attention on a mantle or retail counter but compact enough to fit on a crowded desk or a child's bookshelf. Because the design is intended for 65 lb. cardstock or heavier, the final structure feels solid and substantial, mimicking the weight and presence of a real baked good while remaining lightweight enough to move around safely. The included texturing tips in the instructions are a game-changer, guiding you to add depth and realism that elevates the project from a simple school craft to a sophisticated decorative piece.
Real-World Applications for Creators and Home Decorators
For homeowners and interior design enthusiasts, the primary benefit is longevity. A real gingerbread house is ephemeral; it dries out, cracks, and eventually becomes dust. A papercraft version, however, can be packed away in January and brought back next December, looking exactly as it did the year before. Imagine setting up your holiday village. Instead of worrying about humidity ruining your icing, you can focus on lighting. These structures work beautifully with battery-operated fairy lights tucked inside, creating a warm glow through the "windows" and cutouts. The ability to texture the paper allows you to match your existing decor. You might use metallic markers to add frost to the roof for a glam look or stick to matte earth tones for a rustic, farmhouse vibe.
Parents and educators will find this particularly useful for engaging children in fine motor skill development without the sugar rush. Building a 3D structure requires patience, precision, and an understanding of spatial relationships. When kids follow the PDF instructions to fold tabs and slot pieces together, they are learning engineering basics. In a classroom setting, this can become a collaborative project where students decorate individual houses to create a whole "gingerbread village" on a large table. Unlike edible versions, there are no allergy concerns, and the cleanup involves sweeping up paper scraps rather than sticky floors. It turns a seasonal tradition into a lasting lesson in art and construction.
Commercial and Professional Uses
Beyond the home, the Gingerbread House 3D Papercraft holds significant value for entrepreneurs and marketers. Retailers and cafe owners often struggle with holiday decor that looks cheap or gets damaged by customers. Paper models offer a high-end, bespoke look at a fraction of the cost of ceramic or resin replicas. A boutique could display a row of these along a window ledge, perhaps customized with the shop's logo subtly integrated into the "icing" details. Because the files come in SVG and DXF formats, a business with a cutting machine can produce dozens of units in-house. This reduces shipping costs and allows for last-minute production runs if a display needs refreshing.
Photographers and content creators also benefit from the controllability of paper props. Food stylists often use fake food for shoots because real food melts under hot lights. A papercraft gingerbread house provides the perfect visual cue for holiday campaigns without the logistical nightmare of keeping real frosting intact during a long shoot. Bloggers and influencers can use it as a recurring prop in their seasonal content, knowing it will look consistent across multiple years of photos and videos. The clean lines and defined textures photograph exceptionally well, especially when lit correctly, providing a professional backdrop for product reviews or lifestyle posts.
Technical Considerations and File Compatibility
Before diving into the build, it is crucial to understand the technical side of the download to ensure a smooth experience. The package includes a ZIP file containing SVG cut files, DXF cut files, and PDF instructions. For most users with modern machines like Cricut or Silhouette Designer Edition and above, the SVG cut file is the superior choice. SVGs retain the design's integrity, ensuring clean cuts and accurate scoring lines which are vital for the folds that give the house its 3D shape.
However, if you are using older software or specific platforms like Silhouette Basic Edition, you will need to rely on the DXF files. Here is where many users encounter frustration, so paying attention to the settings is key. DXF files can be finicky; they often open slowly and may not appear as clean as their SVG counterparts. To mitigate this, you must adjust your preferences in Silhouette Studio before importing. Navigate to Edit Preferences, select Import, and change the DXF option from "As-is" to "Centered." This simple step ensures the design loads in the correct position on your virtual mat, saving you time on alignment later. While the instructions note that other software platforms haven't been tested, sticking to the recommended ecosystems generally yields the best results.
Material Selection and Assembly Tips
The success of your final product hinges heavily on material choice. The instructions specify 65 lb. cardstock or heavier for a reason. Lighter paper will result in a flimsy structure that struggles to hold its square shape, especially at the corners where tabs are glued. Heavier cardstock provides the necessary rigidity to support the roof and walls without bowing. When selecting your paper, consider the finish. A matte cardstock accepts glue and markers better for texturing, while a glossy finish might resist adhesives but offer a nice sheen for "icing" effects.
Assembly requires a steady hand and the right adhesive. Liquid glue applied with a fine-tip brush or a precision glue pen works best for tucking tabs into slots without leaving visible residue. Avoid heavy-duty glues that can warp the paper or dry too quickly to allow for adjustments. Take your time with the texturing phase mentioned in the instructions. This is where you transform a flat print into a dimensional object. Using embossing tools, sponges with ink, or even layering small strips of paper can simulate the look of shingles, brickwork, or dripping icing. These small details are what make the difference between a generic craft and a stunning holiday display.
Ultimately, this Gingerbread House 3D Papercraft is more than just a file download; it is a flexible tool for holiday expression. It bridges the gap between digital convenience and tactile satisfaction. Whether you are cutting one for your own mantle or fifty for a community event, the process offers a rewarding blend of technical precision and artistic freedom. By choosing the right materials, respecting the file requirements, and embracing the creative possibilities of texturing, you end up with a decoration that captures the spirit of the season while standing the test of time.